Create a MySQL Database and User
Completing Installation Through the Web Interface
http://server_domain_name_or_IP Or localhost
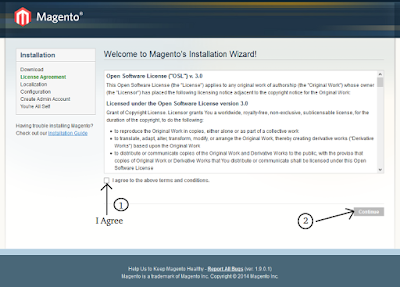
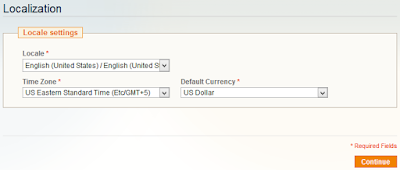
If the previous steps have been followed correctly, you will be presented with Magento's installation wizard. The first page will display the license agreement, which you will need to agree to before you can hit Continue. The next page is where you can change your locale settings, like language, time zone, and currency. Change these to the settings most appropriate to where your products are being sold, then hit Continue.
The Configuration page is broken down into three sections. The first section is where you can set up how Magento connects to its MySQL database. Make sure that Database Type is set to "MySQL" and Host is set to "localhost". You'll then need to fill in Database Name, User Name, and User Password with the settings that you decided on when creating the MySQL database and user account earlier.
The next section on the Configuration page is where you can configure your store's URL, along with a couple of other Apache-controlled functions. Make sure that Base URL matches your server's domain name; if you don't have a domain name set up yet, you can use your server's public IP address for now. It's a good idea to change the Admin Path to something less obvious than "admin" to make it more difficult for someone to find your admin panel. You should also consider checking Use Web Server (Apache) Rewrites to make your site's URLs more friendly to users and search engines. The Apache module needed to support this functionality, mod_rewrite, has already been enabled and is ready for use.
The last part of the Configuration page is for selecting the method of session data storage. Magento ships with two methods of saving user session data. The File System method stores sessions in files on the server and is the simplest method to start with. The Database method stores sessions as entries in the MySQL database and is ideal for Magento installations that span across multiple servers. For now, we can stick with the File System method, since it will generally perform better out of the box.

After you select your configuration options and hit Continue, you'll move on to the admin account creation page. This is where you will create the administrative account that is in charge of maintaining the Magento store. Make sure that the username and password are both secure and difficult to guess. The Encryption Key field should be left blank unless you are migrating data over from an existing Magento installation. If you leave the field blank, Magento will generate a new encryption key when you click Continue and will display it for you on the next page. Make sure that you save that encryption key somewhere safe in case you need it for migration purposes later.

Once you have completed the web-based configuration, your Magento installation will be ready to use. Check out your new storefront by visiting your server's domain name or public IP address in your web browser:
http://server_domain_name_or_IP/
If everything was configured correctly, you should be presented with a storefront that looks something like this:
You can also visit your new admin site by going to the admin directory that you set previously:
http://server_domain_name_or_IP/admin/
Log in with your admin user name and password to see your new dashboard:

Now that you have your Magento store up and running, you are ready to begin building your project catalog and start selling!


No comments:
Post a Comment